[vc_row][vc_column][vc_column_text]You may already be familiar with basic composting, the practice of recycling?rather than trashing?biodegradable kitchen and yard material. Compost may be defined as a body of organic waste that breaks down, decomposing over time into nutrient rich soil.
Organic in this context means something that was once alive or came from a living thing.

Composting is especially popular with those who aspire to a
Zero Waste Lifestyle. According to a
National Waste & Recycling Association survey, over 77 percent of Americans say that they understand the importance of implementing a separate management process for food/yard organic material instead of disposing of it with general household waste. The survey also indicated that, while 72 percent of Americans do
not compost their food waste, 67 percent of these non-composters would be willing to if it were more convenient to do so in their community.
The value of composting takes on a whole new relevance when you consider just
how much Americans waste. As it happens, the United States discards more food than any other country in the world: nearly 60 million tons every year, which is estimated to be almost 40 percent of the
entire US food supply, equating to 325 pounds of waste per person.
Food is the single largest component clogging US landfills, comprising 22 percent of municipal solid waste (MSW). All told, the amount of food wasted in America has an approximate value of nearly $218 billion, which is the equivalent of 130 billion meals.
What is vermicomposting?
If you are intrigued by natural food recycling, check out
How to Start Composting: A Beginner’s Guide. Beyond the basics, you may wish to work even more efficiently, with a little help from some unexpected friends ? worms! Worm composting, also known as vermicomposting, offers many advantages over basic composting.
And you can do it whether you live in a tiny apartment or on a large farm.
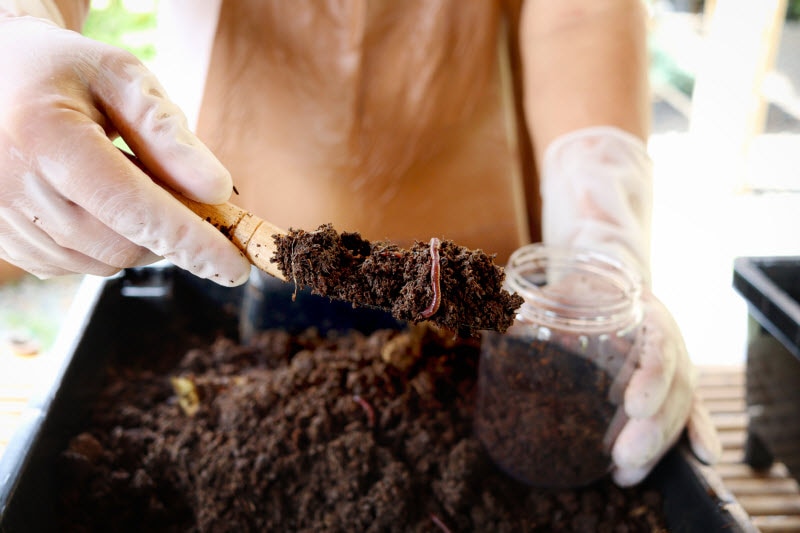
By simply layering your food scraps with dry materials like shredded paper and cardboard and adding the magic ingredient – worms – you can efficiently convert daily food waste into vermicompost, or worm castings. This highly beneficial worm manure, also called ‘compost gold,’ is widely considered to be among of the best soil amendments available in the world of horticulture.
One reason vermicompost is such highly prized fertilizer is that it provides a rich variety of nutrients in a form that is readily available for plant uptake, thanks to the biology of the worm’s gut, which facilitates the growth of beneficial fungus and bacteria. Worm castings also function as a soil conditioner, promoting
more impressive plant growth and yield than conventionally produced compost.
How to start vermicomposting
Composting with worms is a straightforward process once you get the right worms. You want red earthworms, also called red wigglers, which are extraordinarily efficient at transforming food scraps into ‘black gold,’ another term for the final product of rich, organic fertilizer. You can
order these red wiggler worms online; you may have local resources as well.
The wonderful thing is, you only need to buy worms once, as they multiply rapidly. For example, a typical household worm bin might start out with one pound of worms (approximately 1,000 adults), which will soon multiply to 2,000–3,000 in favorable conditions, according to
California’s Department of Resources Recycling and Recovery (CalRecycle). These worm-friendly conditions include:
Space – Worms can be raised on a small or large scale, depending on your goals. To manage food scraps for yourself or your family, a small 12-to 20-gallon worm bin should be adequate. Your container should be dark and opaque, with a lid that allows for aeration and drainage holes in the bottom.
Moisture – Moisture and oxygen are vital for vermicomposting; bedding should be about as damp as a wrung-out sponge.
Temperature – Worms can survive a wide variety of temperatures, but they thrive best at temperatures between 55- and 77-degrees Fahrenheit (13–25 degrees Celsius).
Food – Plant-based food scraps, eggshells, coffee grounds, dried leaves, and more; see full list below, as well as which items to avoid in your compost pile. Avoid large hunks of food; keep scraps small as possible.
Bedding material - Worms need a moist, organic substrate “bedding” in which to live, which they will eat and convert into castings, along with other feed. Also, worm skin is photosensitive and therefore they need a dark environment.
You may be glad to know that worms will regulate their own population if their basic needs are met within the home you make for them. According to the Rodale Institute?an organization long dedicated to growing the regenerative organic agriculture movement through research, farmer training and education?there are a number of
containers that can be used to raise earthworms, including plastic bins of various sizes.
Setting up your worm composting habitat
You can purchase a customized worm bin, such as this reasonably priced
indoor starter kit which comes with free worms. Conversely, you might like to create a DIY worm habitat, which are easy to assemble using, most commonly, large plastic storage bins with lids. Smaller bins are best if you are just starting out, while roomier bins, usually 18-24 inches wide, 24 inches long, and 18 inches deep are typical for larger worm populations.
Your container should be well ventilated, with holes in the top for air and the bottom for drainage. You would then fill about half of the bin with moist, shredded newspaper to use as bedding and then add a handful of garden soil, which will inoculate the bin with microorganisms and sand that the worms use in their gizzard to grind food. Check out these instructions from Washington State University for making your own
Cheap and Easy Worm Bin.
Once you have added your worms, Place the bin in a cool dark location with minimal temperature fluctuations. As for their food source,
FoodPrint, a non-profit organization dedicated to research and education on food production practices, provides this helpful guide on what should and should not be included:
Items to compost with your worms:
- Food scraps (including things like melon rinds, roots, stems, leaves, cores, husks, seeds, skins, peels, etc.).
- Eggshells (but not whole eggs), seaweed and rinsed seashells (like oyster shells; not shrimp peels).
- Old natural fiber clothing (old t-shirts, socks, boxers, etc.)
- Natural yarn, twine and string.
- Non-glossy paper products (cardboard boxes, newspapers, magazine inserts, most junk mail, envelopes, etc.)
- Tea leaves and bags (remove the staple!); coffee grinds and filters.
- Dead plants, grass clippings, pine needles and leaves – just make sure they have not been sprayed with pesticides.
- Natural non-treated wood and byproducts like wood ash, sawdust and shavings (no coal ash).
- Feathers and hair (human, cat, dog, etc.)
- Dryer lint.
Items you cannot compost in your worm bin:
- Lemon, lime, orange or other citrus peels and juice (in excess this will make the soil too acidic).
- Onions and garlic (a good rule of thumb is if it makes you smell, it makes your worm bin smell).
- Meat, fats, grease, bones or oils (no butter, lard, stocks, soups, etc.)
- Plastics and plastic-coated paper (like glossy magazines).
- Stickers, including veggie stickers (remove stamps from envelopes).
- Bread or yeast products (no crackers or cakes).
- Salt, pepper and other spices.
- Milk, dairy or dairy products.
- Cat or dog feces.
- Diseased or infested plants.
- Treated wood products.
How to use your ‘black gold’
As you continue vermicomposting, you will be accumulating the highly desired final product, concentrated worm castings or ‘black gold,’ which, again, is arguably the richest natural fertilizer known to humans. In fact, it has been estimated to stimulate plant growth more than any other natural product on the market. You can mix this nourishing organic fertilizer into potting soil for house and yard plants; you can also add it to in-ground plants. It has been estimated that a mere half-inch top dressing of pure worm castings can provide enough nutrients to feed your plants for more than two months.
While this project may sound ambitious, it is really about a basic set-up, which is surprisingly easy to maintain once you get into the swing of it. If you need some help, this
quick reference guide is a useful resource. Happy vermicomposting![/vc_column_text][/vc_column][/vc_row][vc_row][vc_column][vc_text_separator title="Compostable Essentials" border_width="2"][vc_row_inner equal_height="yes" content_placement="middle" gap="35"][vc_column_inner width="1/3"][vc_single_image image="172671" img_size="full" alignment="center" onclick="custom_link" img_link_target="_blank" css=".vc_custom_1706977587250{padding-right: 7% !important;padding-left: 7% !important;}" link="https://www.vitacost.com/biobag-small-food-scraps-bag"][/vc_column_inner][vc_column_inner width="1/3"][vc_single_image image="172670" img_size="full" alignment="center" onclick="custom_link" img_link_target="_blank" css=".vc_custom_1706977604261{padding-right: 7% !important;padding-left: 7% !important;}" link="https://www.vitacost.com/repurpose-compostable-everyday-plates-9-inch"][/vc_column_inner][vc_column_inner width="1/3"][vc_single_image image="172669" img_size="full" alignment="center" onclick="custom_link" img_link_target="_blank" css=".vc_custom_1706977621815{padding-right: 7% !important;padding-left: 7% !important;}" link="https://www.vitacost.com/package-free-reusable-vegan-food-storage-wrap"][/vc_column_inner][/vc_row_inner][/vc_column][/vc_row]
 Composting is especially popular with those who aspire to a Zero Waste Lifestyle. According to a National Waste & Recycling Association survey, over 77 percent of Americans say that they understand the importance of implementing a separate management process for food/yard organic material instead of disposing of it with general household waste. The survey also indicated that, while 72 percent of Americans do not compost their food waste, 67 percent of these non-composters would be willing to if it were more convenient to do so in their community.
The value of composting takes on a whole new relevance when you consider just how much Americans waste. As it happens, the United States discards more food than any other country in the world: nearly 60 million tons every year, which is estimated to be almost 40 percent of the entire US food supply, equating to 325 pounds of waste per person.
Food is the single largest component clogging US landfills, comprising 22 percent of municipal solid waste (MSW). All told, the amount of food wasted in America has an approximate value of nearly $218 billion, which is the equivalent of 130 billion meals.


